The post How to wash a sailing jacket and keep it efficient season after season appeared first on Yachting News.
]]>How to wash a sailing jacket to keep it performing properly.
A sailing jacket is one of those garments that, on board, quickly stops being just clothing. It becomes a second skin, an indispensable ally when the wind picks up, the sea comes on deck, and the hours at the helm stretch far beyond what was planned. And precisely for this reason, its maintenance is often underestimated: it is taken for granted until, suddenly, it stops doing its job. Water no longer runs off, moisture stays trapped inside, zippers begin to stiffen, and the feeling of protection gives way to discomfort.
Washing a sailing jacket correctly is not a secondary task, but an integral part of its working life. Salt, sweat, oils, and environmental dirt act slowly but constantly on the fibers and technical membranes, compromising their performance. Knowing how to wash a sailing jacket, which products to use, and which precautions to take means extending its lifespan and making sure it continues to work when it really matters.
Why a sailing jacket needs to be washed
One of the most widespread beliefs among boaters and sailors is that a sailing jacket should be washed as little as possible to avoid damaging it. Actually, exactly the opposite is true. Salt water, once dry, leaves crystalline residues that settle on the surface and inside the fibers. Over time, these residues stiffen the fabric, hinder breathability, and compromise the material’s ability to repel water. This is why it is key to know how to wash a sailing jacket properly.
To this is added the effect of sweat, which is inevitable even in the coldest seasons. Body salts penetrate the inner layers of the garment and, if not removed, alter the behavior of the waterproof membrane. A dirty sailing jacket therefore breathes less effectively, manages internal moisture poorly, and gives a damp feeling even when there is no actual water ingress.
Washing a sailing jacket regularly is therefore a functional operation, not an aesthetic one. It is necessary to keep the entire system it is made of efficient, consisting of the outer fabric, the inner membrane, and the surface treatments.

The most common mistakes in sailing jacket maintenance
In most cases, people damage a sailing jacket without even realizing it. The first mistake is to consider it an “indestructible” garment and treat it like an old windbreaker. Harsh detergents, high-temperature washes, or the use of fabric softeners quickly compromise the performance of technical fabrics. In fact, the additives found in common laundry products tend to clog the pores of the waterproof membrane, making it less breathable and less effective over time.
Another common mistake is forced drying. Exposing a sailing jacket to direct heat sources such as radiators, heaters, or full sun accelerates material aging and can irreversibly deform some critical areas, especially taped seams and reinforced sections.
Improper storage also plays an important role. Putting away a sailing jacket that is still damp in a locker or a closed bag creates the ideal environment for mold, bad odors, and fabric degradation, especially on board where ventilation and temperature are not always easy to control.
How to wash a sailing jacket: preparation before washing
Before proceeding with the actual wash, it is essential to dedicate a few minutes to preparing the garment. All zippers should be closed, including those on the pockets and ventilation openings. This precaution prevents the teeth from damaging the fabric during machine washing or hand washing.
The adjustment straps, cuffs, and Velcro collars should be properly secured to avoid friction points. Removable hoods should also be left attached, unless otherwise specified by the manufacturer, so that the washing process is uniform across all parts of the garment.
A preliminary visual check also helps identify any oil or fuel stains that may require a gentle pre-treatment, always using products compatible with technical fabrics.

How to wash a sailing jacket in the washing machine without damaging it
Machine washing is now allowed for most modern sailing jackets, provided some specific rules are followed. The water temperature should remain low, generally around 30°, using a gentle cycle that limits spinning. Excessive agitation stresses the fibers and can compromise the internal taped seams.
The detergent is a key element: it must be specifically designed for waterproof and breathable technical clothing. Traditional soaps, as well as bleach and fabric softeners, should be avoided because they leave residues that alter the membrane’s performance. The dosage should also be moderate: a clean sailing jacket is one free of residues, not one soaked in fragrance.
A thorough rinse is just as important as the wash itself. Completely removing the detergent allows the jacket to regain part of its original breathability and prepares the fabric for any subsequent water-repellent treatment.
Hand washing as a safe alternative
When possible, hand washing is a particularly gentle option. Using lukewarm water and a suitable detergent, it is possible to work with greater control on areas prone to dirt, such as cuffs, collar, and shoulder regions.
It is important to avoid vigorous rubbing and twisting of the fabric. After washing, rinse thoroughly until the water is completely clear and free of foam. Even in this case, haste is the enemy of the sailing jacket: it is better to spend a few extra minutes than to compromise a garment designed to last for years.

How to wash a sailing jacket: proper drying and moisture management
A sailing jacket that has been washed correctly can be ruined in an instant by improper drying. The best method remains natural air drying, in a shaded and well-ventilated area. Hanging the jacket on a sturdy hanger, avoiding folds and overlaps, allows moisture to evaporate evenly.
It is important to ensure the garment is completely dry before storing it. Even minimal residual moisture can, over time, cause unpleasant odors and material deterioration, especially if the jacket is stored on board.
Restoring water repellency over time
With use and repeated washes, the surface water-repellent treatment gradually loses effectiveness. The sign is clear: water no longer beads on the surface but tends to “soak” into the fabric. In these cases, it is possible to restore water repellency using products specifically designed for this purpose, applied to a clean and dry garment.
These treatments do not replace the internal waterproof membrane, but they allow the outer fabric to perform correctly, promoting water runoff and also improving overall breathability.

Zippers, seals, and details: maintenance that makes a difference
A sailing jacket is not made of fabric alone. Zippers, seams, reinforcements, and adjustment systems are essential elements for its functionality. After washing and drying, paying attention to the zippers helps prevent oxidation and sticking. Light periodic lubrication keeps them smooth and extends the garment’s lifespan.
Collars, cuffs, and seals, especially on more technical jackets, deserve constant care. Keeping them clean and dry preserves their elasticity and effectiveness over time.
Off-season storage
When the sailing jacket is not used for extended periods, proper storage becomes crucial. Hanging it in a dry and ventilated area is always preferable to storing it in closed bags or lockers. Avoiding prolonged compression preserves the fabric’s structure and reduces the formation of permanent creases. A well-washed, dry, and properly stored sailing jacket is ready to go back into action without surprises on the first challenging outing.
And if, after reading this article, you still crave the sea and boats, check out the brand-new YouTube channel of The International Yachting Media, where you’ll find plenty of sea trials and nautical tutorials.
The post How to wash a sailing jacket and keep it efficient season after season appeared first on Yachting News.
]]>The post Jib trimming: a balancing act between sheet, traveler and halyard appeared first on Yachting News.
]]>Jib trimming
Like mainsail trimming – that we’ve already dealt with in a previous article – jib trimming, too, is intended to give the sail a correct shape. In general terms, we can say that if we use the traveler, moving the block across the track and therefore the point where the sheet is positioned back and forth, the effects of this movement will affect sail twist while sheet trimming will inevitably affect sail concavity. The combination of the two elements makes the traveler change the shape of the upper part of the sail while the sheet tension contributes to change the shape of the lower part.

When the traveler is moved forth, the sheet stretches the leech more than its base, pulling down the clew, that its the point where the sheet is applied to, making the sail “close” and producing a significant reduction in sail twist.
When the traveler is moved back, on the contrary, the sheet stretches the jib base. This way, the sail “flattens out”, the clew tends to take a higher position, with a more pronounced twist. The jib therefore opens high and lets wind pressure out.
Always in general terms, when the wind gets stronger, the traveler should be moved back; when we need more power, on the contrary, the traveler should be moved forth. Without never forgetting the sheet, of course. Since the two elements interact with each other. If, for example, the sheet is eased but the trailer is not moved forth, the clew will tend to go up, making the jib twist and lose its power.
Basically, the best thing to do is to observe and “read” the sail, correctly interpreting what it says. Signs can be multiple. First of all, let’s establish a simple mnemonic rule: a correct position of the traveler enables the sheet to become an ideal extension of the bisector which extends from the centre of the sail luff and bisects the sheet angle.
However, this rule should be taken with a grain of salt because the jib communicates many other signals which, in turn, need to be interpreted correctly.
Let us take a practical example and show you what is, in our opinion, a right way to perform jib trimming.

Many of us generally take advantage of jib furlers, which means that the sail is already hauled. However, no one says that we can’t change the halyard tension if we realize that some wrinkles trouble the laminar air flow when sailing to windward or with the wind abeam. Especially if we consider that halyard tension also affects fullness position: greater the tension is, more the fullness will move forward. Of course, this applies only to traditional sail clothes while modern materials are much more rigid and less subject to halyard tension. In this case, the most important element is the tension exerted by the stray which can be adjusted through the backstay.
In fact, when the backstay is stretched, the masthead tends to move back and therefore give tension to the forestay. Vice versa, when the backstay is eased, the stay becomes slacker and produces a more or less pronounced forestay sag. The backstay can be therefore stretched to reduce the fullness and flatten the jib in its upper part or, vice versa, it can be eased to make the stay slacker and increase the fullness.
In this case, too, it is important to grasp the right balance between two interacting elements, that is the stay and the halyard’s tension. If the stay produces a forestay sag, it is useless, if not damaging, to haul the halyard in.
Once the jib is unfurled and the halyard tension adjusted, we can trim the jib after making sure that telltales are parallel to each other and to the deck. The upper part of the sail, too, should have the correct shape and orientation.
We perfectly know that the wind is very strong up there. So, even the apparent wind – the most important for us – will be stronger and with a wider angle about the boat axis than the wind we perceive in the cockpit or on the upper part of the sail. Sails are twisted for this reason but this may not be enough. If the windward windex is not parallel to the deck, the traveler should be moved back so that the upper part of the jib can be opened and correctly oriented to the wind; vice versa, is the sail flaps in that zone, the traveler should be moved forth in order to close the leech and reduce twist.
As for downwind courses, telltales cannot help us in trimming the jib. However, what we’ve said about the halyard-traveler interaction is always true.
In short, we can lay down some general little rules:
- When sailing in light wind or downwind, in addition to trimming the sheet to adjust concavity, we can move the traveler forth to reduce jib twist and make it more powerful.
- When the wind gets stronger, we can move the traveler back and haul both the halyard and the backstay in order to flatten the sail and increase twist in the upper part.
The post Jib trimming: a balancing act between sheet, traveler and halyard appeared first on Yachting News.
]]>The post Mainsail trimming: 4 steps to keep it “in shape” appeared first on Yachting News.
]]>Mainsail trimming is the key element when looking for good performances on board. A correct trim in the mainsail not only makes your boat more performing but, above all, it is synonym with a well-balanced boat regardless of wind power, sailing points and sea conditions.
This ambitious project inevitably requires two essential things: a correct position of the mainsail, that is angle of the sail to the wind, and a good shape. These two goals can be achieved with the help of a varied set of instruments, including, first of all, the halyard, the sheet, the traveller, the boom vang, and, secondarily, the backstay, the Cunningham and so on, according to the type of boat we use.
On board their normal cruisers, yachtsmen generally trim the mainsail by simply hauling and easing the mainsail sheet according to their sailing point and until the sail is correctly adjusted and the leech ribbons are parallel to the deck. However, it is important to know that mainsail trimming can involve more rigging, too, and this is exactly the aspect that we want to deal with today.
 First of all, let’s take care of the mainsail shape by carrying out the first manoeuvre, that is to hoist the sail. Let us make an introductory remark. Even if we’re going to consider sails one at a time, the mainsail and genoa interact with each other and a correct trim of the mainsail is possible when also the fore sail is hauled.
For the time being, let’s simply haul the sheet. The sheet tension should be proportionate to wind power. If its is too taut, the mainsail will show some vertical wrinkles. The same goes for the base because, if it is too tense, it will result in a multitude of horizontal wrinkles.
Mainsheet
The mainsheet is the primary mainsail control. Once it is hauled and with the right tension, the mainsheet can achieve its correct shape. If we haul the sheet, the boom will be inevitably pulled down and, therefore, the twist on the top of the sail significantly reduced. Vice versa, if we ease the mainsheet, the boom will be pulled up and the twist considerably accentuated. In general – unless the sail is so worn-out to look like a shapeless sack – in order to achieve a correct mainsail twist, the top stick should be parallel to the boom.
It follows that, if the top stick is upwind, this means that the sail is little twisted and therefore too closed; conversely, is the top stick is downwind, the sail is too twisted and thus too open.
Correct mainsail twist is an essential aspect because wind speed can be different according to the altitude. The true wind we perceive in the cockpit and, more specifically, at the boom is less powerful than that one we can perceive at the mast top. Depending on the wind power, for a 10/15-metre-high mast, the difference can even touch 20-25%. Of course, this difference also affects the speed and direction of the apparent wind. Hence the need for a correctly twisted mainsail with a good positioning in relation to wind direction and height.
Traveller

Once the mainsail has achieved its correct shape, it is important to give it the correct position to the wind. The traveller is the main control in the sense. It is a relatively modern rigging since it appeared the first time on the Star yachts in ’50s. While the sheet contributes to achieve the best mainsail shape, the traveller is a device that allows for changing the mainsail position.
By moving the traveller, the mainsail indeed moves upwind or downwind while preserving the shape its has just obtained with the help of the sheet. The traveller should be used in concert with the helm. The helmsman, in fact, should recognize an almost imperceptible tendency of the boat to luff. However, if this tendency is too strong, the traveller should be retracted downwind; vice versa, if the boat tends to bear away, the traveller should be moved a little downwind. When taking part to a sailing competition, this trimming should be continuous in order to keep an excellent angle of attack of the wind on the sail. Especially when sailing in gusty conditions, the work of the trimmer is non-stop.
Things change on board a normal cruiser. Often, yachtsmen use only the sheet. The sheet tension, in fact, not only affects the mainsail shape but is also makes the boom move laterally, with the result that the laziest end up giving the mainsheet a dual function: to adjust both the positioning and shape of the mainsail.
Boom vang
If we are sailing upwind on board a normal cruiser, the use of the boom vang is almost non influential. On the contrary, when a boat sails downwind, the boom vang plays a decisive role in controlling the shape of the mainsail since it affects twist according to its position (more twist when it is eased, less twist when hauled) while the sheet determines the orientation of the sail.
 Base, halyard and Cunningham
Once the mainsail has achieved a correct shape and position, we can continue to trim the traveller in response to possible changes in wind power. If wind weakens, the traveller can be moved upwind, the base and halyard eased in order to make the sail more concave.
Vice versa, if wind gets stronger, the travelled should be moved downwind in order to reduce the wind pressure on the top. Meanwhile, the halyard should be hauled in order to have a flatter sail. If you boat is equipped with a Cunningham, its use is more beneficial than the simple halyard.
Once these four “rules” are established, it is now up to us to experiment with our own mainsail, using the sheet, the traveller, the halyard, looking at their effects and seizing the best opportunities they offer. After all, sailing even only an half a knot faster than expected is always a little pleasure we can’t resist.
The post Mainsail trimming: 4 steps to keep it “in shape” appeared first on Yachting News.
]]>The post Watermaker: how to install and maintain it properly appeared first on Yachting News.
]]>A watermaker is designed to produce fresh water from seawater. It’s ideal for nautical use—reliable, compact, and easy to manage. We spoke with Mario Alagna, one of the owners of OSMOSEA, an Italian company with over 15 years of experience in the design, production, and distribution of reverse osmosis watermakers and purifiers. He explained how to properly install this essential accessory and, above all, how to keep it in top working condition given its importance on board.

How to install a watermater
The watermaker kit usually includes the following components:
• Main watermaker unit
• Remote panel (if applicable)
• Feed pump
• Sediment pre-filter
• Activated carbon post-filter
• Activated carbon flushing filter
• Filter wrench
• Tubing and fittings
As for positioning, OSMOSEA recommends installing the watermaker in a dry, well-ventilated area (the engine room is not recommended unless it has proper ventilation). It should be easily accessible for maintenance, and away from heat sources and exhaust fumes.
It is important to install the feed pump as close as possible to the dedicated seawater intake, which should be equipped with a ball valve and, if possible, located below the waterline.
The hydraulic connections are quite simple: just connect the intake hose to the existing seawater through-hull or install a new one (recommended diameter: 1⁄2” or 3/4”).
It is recommended to install a basket strainer before the feed pump. The pre-filter should be placed between the feed pump and the main watermaker unit, using 5-micron filter cartridges.
For the discharge, connect the brine outlet to a hull through-fitting or siphon. For the freshwater outlet, it is advisable to connect a suitable hose to the top part of the tank (e.g., 10 mm PE or PVC) and avoid long runs whenever possible.
As for electrical connections, check the voltage (e.g., 12V, 24V, or 230V depending on the model) and connect the control unit to the electrical panel with appropriate protection (fuse or circuit breaker). If required, connect the remote control panel. Osmosea always includes a manual in the installation kit, complete with an electrical diagram and easy-to-follow steps.

First Start-Up
Special care should be taken during the first start-up. Mario Alagna confirms that, to ensure the hydraulic connections are correct, it’s best to proceed as follows: first, open the seawater intake and turn on only the feed pump.
If there are no leaks and the inlet pressure reaches at least 1.5 bar, you can then switch off the feed pump and start the main system.
At this point, the system should reach full operation and begin producing fresh water.

Watermaker: precautions to take
It is important to avoid running the feed water pump without incoming water for extended periods during the initial start-up/priming phase, in order to prevent irreversible damage. Therefore, it is essential to ensure that the seawater intake valve is open and that the pipe upstream of the feed pump is filled with water. “And – adds Mario Alagna – immediately stop operation in the event of abnormal vibrations or leaks. In such cases, electrically isolate the desalination unit before performing any maintenance work”.
What maintenance does a watermaker require?
The essential maintenance tasks for optimal performance are few and very simple, confirms the owner of OSMOSEA. Replace the pre-filters every 100–150 hours of use or once a month, perform a chemical cleaning if production starts to drop, keep the system clean with the “flush” cycle, and, in case of prolonged inactivity, run a preservation treatment with a special storage solution.
What issues might arise?
The main cause of damage to a watermaker is failing to open the seawater intake, which can seriously damage the feed pump—so always check the system before starting it.
A second issue can occur when using the system while navigating in rough seas, as air may enter the pipes and disrupt the system’s operation.
It’s also important to run the watermaker in clean water, as dirty or polluted water can clog the filters prematurely or damage the osmosis membranes.
The watermaker is a relatively simple machine, but it must be operated and maintained with care, following a few basic rules, concludes Mario Alagna.
The post Watermaker: how to install and maintain it properly appeared first on Yachting News.
]]>The post What are redans? Renato Magazzù explains it to us appeared first on Yachting News.
]]>Renato Magazzù explains what redans are.
Renato Magazzù is an extraordinary person. Not only because he has been leading, alongside Claudio and Tina, what is probably the most iconic shipyard in the Maxi-Rib segment for years, but also because he is one of the most skilled and knowledgeable engineers the boating industry can boast.
A precious quality that Renato, modest and reserved, almost reluctantly admits, fearing that all this experience might be mistaken for arrogance—a flaw from which he is, in fact, completely free.
Yet, to those like me who are lucky enough to call him a friend, Renato shares fascinating stories that, steeped in history, unmistakably reveal his immense stature in the field of naval engineering.
 It is no coincidence that Renato is frequently called to serve as a technical consultant in the most important judicial investigations in our sector, such as the recent “Open Arms” case, the investigations into the sinking of the “Nuova Iside” in collaboration with the RIS forensic team and the Italian Coast Guard, or inquiries into the fires aboard the Tirrenia ship “Vincenzo Florio”. He has also contributed to investigations into several tragic cases of migrant shipwrecks in the Mediterranean.
But these are only a few of the investigations in which he has participated as a technical consultant; there are many more, and it comes as no surprise. Renato built his expertise as early as the late 1980s when, despite being very young, he was already working on tests in naval towing tanks and collaborating as a naval engineer in the development of major fast passenger vessel projects.
To all this, we must add a long period of research in the hydrofoil sector, involving the study and development of specific performance calculation programs, wing profiles, as well as research on seaplanes, their performance, and configurations. This experience has allowed him to greatly deepen his specific know-how, especially on the subject that this article focuses on: redans.
You can easily understand, then, why, when I needed to write an article that could simply explain what redans are, Renato Magazzù was immediately my first choice—he is one of the most knowledgeable professionals in this field.
Renato, there is a lot of talk about Redans and their benefits, and you are certainly an expert in this area. Can you explain to us, simply and practically, what they are?
Redans, or “steps,” are special “notches” placed under the hull that can be seen on some high-performance planing boats.
This solution was developed in the early decades of the last century to be applied to seaplanes, where the need to sharply detach from the water was essential to reduce resistance, thereby making the best use of available power during the takeoff run and achieving the fastest and shortest takeoff possible. Another advantage for seaplanes was having a precise point to perform the “rotation,” that is, the nose-up maneuver necessary for lift-off.

What effects do redans trigger, and what are the advantages of using them in modern boats?
Today, their use on modern planing hulls generates the following effects:
- The hull’s bottom is lubricated by the air drawn in through the lateral “scoops,” resulting in a substantial reduction in friction;
- The boat in planing mode “rests” on multiple distinct surfaces, which generates better “aspect ratio” (in the aeronautical sense, i.e., laterally relative to the direction of motion), once again reducing resistance.
Both effects thus allow for greater hull efficiency, and a hull equipped with redans benefits in the following ways :
1 – An improvement in overall performance, which implicitly translates into a reduced need for power (and therefore lower fuel consumption) compared to a traditional hull at the same cruising speed. This means that, for the same power, a hull equipped with redans achieves a higher speed than one without. In practice, on our models, we have recorded increases of up to 8 knots in maximum speed, especially in the higher speed ranges and obviously with the same engine configuration.
2 – Easier handling; thanks to the adoption of redans, the trim of the boats equipped with them is uniquely determined by the respective heights of the steps on the hull bottom. Thus, there is no need (nor is it beneficial) to use trim adjustments, from the acceleration phases all the way to maximum speed. This is because the reduction of the wetted surface area—normally achieved by trimming up the bow to reach higher speeds—is instead automatically obtained through the air that is sucked in and channeled along the hull bottom.
3 – Better seaworthiness; when navigating a boat equipped with redans, the trim angles are always reduced and remain independent of the speed at which the boat is traveling, as they are determined by the geometry of the redans and are dampened by the presence of air beneath the hull.

These are definitely interesting advantages. So, are your boats equipped with redans?
Of course, yes. This particular configuration was introduced on our models starting in 2007. It was a major innovation that also led us to change the naming of our models: those equipped with redans are distinguished by the letter X, such as the MX-11, MX-12, and so on.
This type of hull is undoubtedly more effective than traditional ones, and therefore essential for high-performance Maxi-Ribs or, in general, for models that belong to a top-tier market segment, as is our case.
To draw a comparison with the automotive world, it would be like a modern high-end or high-performance car today not being equipped with certain technologies like ABS or traction control.
Today, it’s the “machines” themselves that must meet the needs of the user, making their use simpler, safer, and more efficient.

The post What are redans? Renato Magazzù explains it to us appeared first on Yachting News.
]]>The post Used Boats: a guide to avoid unpleasant surprises appeared first on Yachting News.
]]>The market for used boats, after experiencing a significant post-Covid boom, has slowed considerably, creating new challenges for industry professionals. While just two years ago it seemed like a new golden age for both new and used boats was dawning, today’s market has become far more complex. Boat owners, now more aware of the costs associated with owning a vessel, approach purchases with greater caution and understand the importance of relying on professionals to avoid unpleasant surprises. In this context, yacht brokers play a key role in guiding clients toward selecting the ideal boat.
We interviewed Dr. Michele Borrelli, an expert with over 20 years of experience in the yachting and used boat industry, to gather valuable tips for those entering the world of pre-owned boats.

Michele, how has the used boat market changed in recent years?
In recent years, the used boat market has gone through a phase of rapid growth followed by a period of adjustment. After the pandemic, demand surged, driven by a desire for freedom and social distancing, leading to a quick reduction in available stock and an increase in prices. However, the situation has changed: today, buyers are more cautious and selective. Expectations are higher, and the value-for-money equation has once again become central in decision-making.
What’s more, there has been greater awareness regarding the maintenance and operating costs of a boat. Many boat owners who purchased boats in recent years have realized the expenses involved, leading to an increase in the number of boats entering the market. This has created new opportunities but also made it necessary for new buyers to exercise greater caution. The quality of available boats varies greatly, requiring careful analysis to distinguish real bargains from hidden risks.

What advice would you give to those new to the world of boating?
The first piece of advice is to rely on a professional in the field. An experienced broker is a valuable ally to avoid costly mistakes and navigate safely through regulations, technical assessments, and purchase contracts. Buying a boat is a complex process that requires specific experience, and qualified support can make a difference, especially when it comes to used boats.
The second suggestion is to dedicate time to planning. It’s important to clearly define your needs, considering whether you prefer a sailing boat or a motorboat, the appropriate size, and the necessary equipment. Each choice depends on the desired sailing style and the type of outings, which can range from long cruises to short day trips.
Equally important is setting a realistic budget. In addition to the purchase price, it’s essential to consider maintenance costs, mooring, and insurance. Planning for these aspects helps avoid surprises and ensures the boat can be managed sustainably in the long term. Finally, investing in proper training, such as navigation or sea safety courses, enhances the overall experience and reduces risks.
What are the most important criteria for choosing a good used boat today?
In addition to the price, the boat’s history is crucial. Evaluating the number of sailing hours, documented maintenance, and the overall condition of the hull and engine are essential elements. It’s indispensable to carry out a thorough inspection with a certified marine surveyor, who can detect structural or technical defects that may be invisible to an untrained eye. The transparency of the documentation is equally important: checking the regularity of the logs, legal ownership, and the absence of liens or mortgages protects against future issues.

What are the essential steps in the purchasing process?
The process always begins with defining your needs and preferences, followed by a systematic search of available boats on the market. After identifying a potentially suitable model, it’s crucial to conduct a thorough technical survey and request a sea trial to check the boat’s performance and seaworthiness. Another critical step is drafting a detailed sales contract that includes all warranty clauses and protections for the parties involved. The support of a specialized lawyer or an experienced broker ensures that the entire process complies with current regulations.
What unexpected issues can be avoided by following these tips?
The most common unforeseen issues relate to mechanical failures or structural defects that were not identified before purchase. Engine problems, outdated electrical systems, or hidden hull damage can lead to significant costs. Legal complications, such as purchasing a boat with undisclosed liens, can also be avoided with careful due diligence. Therefore, the inspection and document verification phase is crucial.
What is the difference between the used motorboat market and the used sailing boat market?
The motorboat market is generally more dynamic and appeals to a broader audience due to ease of use and greater speed. Motorboats are often preferred for short outings or by those who prioritize comfort and power, making them ideal for coastal cruising and recreational activities like sport fishing. This market segment is highly sensitive to technological advancements, such as new low-consumption engines or hybrid solutions.
Sailing boats, on the other hand, attract a more niche clientele, passionate about traditional sailing and eco-friendly aspects. Choosing a sailing boat involves paying more attention to the condition of the sails, mast, rigging, and ballast systems. The sailing boat market tends to be more stable, with a strong link between resale value and ongoing maintenance. However, the sailing experience requires specific skills, which is why purchasing a sailing boat often involves a more in-depth evaluation of one’s abilities and expectations.
What does 2025 hold for the boating market?
2025 will likely be a year of consolidation for the sector. We expect a balance between supply and demand, with increasing interest in sustainable and energy-efficient solutions. Technological innovations, such as hybrid and electric propulsion, will play a key role, and buyers will increasingly be focused on boats that offer comfort, safety, and lower operating costs.
Thanks to Michele Borrelli for this in-depth overview. Approaching the purchase of a boat with awareness and the right support can turn the dream of sailing into a wonderful reality without unpleasant surprises.

About MICHELE BORRELLI
Michele started at a very young age in the world of boating and everything related to the maritime industry. A lover of the sea, he embarked as a crew member on recreational ships, learning a lot and gaining experience that later led him to work for important shipyards, both as a post-sales manager and as a consultant. Today, he is an established professional and a reference for many clients who rely on his expertise and valuable assistance.
The post Used Boats: a guide to avoid unpleasant surprises appeared first on Yachting News.
]]>The post The 10 knots every sailor should know: comprehensive guide appeared first on Yachting News.
]]>The 10 knots every sailor should know
The 10 knots every sailor should know is a comprehensive guide that includes articles we have written over the years, illustrating how to masterfully execute the many essential knots used on a boat. This valuable resource, complete with photos and videos, makes life on board easier during your sailing adventures.
Below, you’ll find our personal ranking of the ten most important knots. By clicking on the link associated with the knot of your interest, you’ll be directed to a detailed explanation of how to tie it.
Happy reading, and good luck practicing!
1 – The Bowline Knot: the most common knot on a boat

The Bowline Knot is undoubtedly the most widely used knot on board. It has two key features: it creates an extremely useful and secure loop in various conditions, and it is very easy to untie, even after being subjected to heavy loads.
This knot offers exceptional strength under tension, making it ideal for mooring or securing halyards and sheets. However, it is not a universal knot, as it may loosen when not under tension.
Its main limitation is that tying it on a rope already under tension is, in our opinion, nearly impossible.
2 – Clove Hitch (the fender knot)

Useful, simple, quick to tie, and—importantly—capable of being tied even on a rope under tension. These are the hallmarks of the Clove Hitch, one of the most commonly used knots on a boat. It is particularly handy for securing or fastening various items on board, from fenders to coiled ropes.
While it is straightforward to execute, it is not always tied perfectly, as evidenced by the many fenders that can be seen adrift.
4 – Sheet Band

The Sheet Bend, also known as the Weaver’s Knot, is ideal for joining two ropes of different thicknesses.
This makes it perfect for attaching a flag to the halyard used to hoist it.
However, we wouldn’t recommend using this knot to join two ropes for mooring purposes, as the repeated tension and release could eventually cause the knot to come undone.
Link to Sheet Band Instructions
5 – Rolling Hitch
A stuck line, a mooring line to shorten, or an anchor line to relieve—there are countless reasons on a boat to transfer tension from one rope to another.
The methods attempted in such situations are often varied but frequently ineffective. Using a Rolling Hitch, however, is likely the most efficient solution.
Link to Rolling Hitch Instructions
6 – Pulley: knots on board to reduce effort

When a strong pull is needed, setting up a pulley on board is an excellent solution. It’s often used to secure something on deck, like a tender, or as shown in the photos, to fix the boom.
The process is as simple as it gets, but a common mistake occurs in the heart of the pulley: the loop through which the running end of the line (the free part) passes. Ensuring this is done correctly is key to effective use.
7 – Anchor Bend

The Anchor Bend does not adhere to one of the key characteristics of maritime knots: being secure while also easy to untie when needed.
Once tightened, this knot becomes very secure but essentially “permanent,” often requiring a knife to cut the rope if it needs to be replaced. For this reason, it’s considered a “disposable” knot. Its exceptional security places it within the family of so-called “binding knots”.
Link to Anchor Bend Instructions
8 – (Double) Carrick Bend, joining knots for boat lines

The Double Carrick Bend has been the most widely used solution along docks worldwide for centuries to join mooring lines.
Advantages? It’s easy to tie, doesn’t slip (even on wet ropes), offers exceptional holding power, and is easy to untie (though it can become very tight, it can always be loosened in the end).
Disadvantages? It tends to become quite bulky and works best with lines of a certain diameter.
Link to Carrick Bend Instructions
9 – Weaver’s Knot

With an intriguing name and relatively unknown to many, the Weaver’s Knot is both useful and easy to execute. It falls into the larger family of “loops, eyes, or nooses on a single rope,” as defined in the “bible” of knot tying, Clifford W. Ashley’s The Complete Book of Knots.
So, if you need to create a tackle to reduce tension, secure a package, or simply create a connection point on your line, the Weaver’s Knot is your go-to. It’s quick to tie, and unlike knots typically used by less experienced sailors, it can be untied even after enduring heavy loads.
Link to Weaver’s Knot Instructions
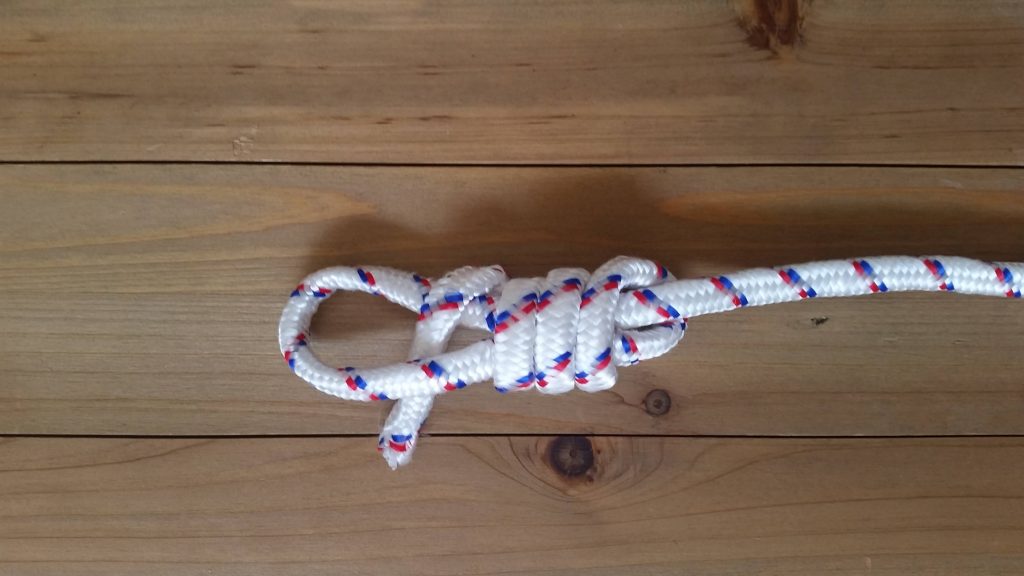
10 – Franciscan Knot: weighting knots

The Franciscan Knot falls into the categories of “weighting knots” or “stopping knots”.
It is very easy to tie and is often taught early on to young sailors, as it provides a sense of accomplishment when completed.
Link to Franciscan Knot Instructions
You can find videos of the knots to know on a boat in our new YouTube channel, under the “Tutorial” playlist.
The post The 10 knots every sailor should know: comprehensive guide appeared first on Yachting News.
]]>The post The “Franciscan Knot”: a basic, (fairly) useful, and easy Knot appeared first on Yachting News.
]]>The Franciscan Knot
The Franciscan knot can be categorized as a stopper or weight knot. It is quite easy to tie and is often taught to young learners early on, as its creation is satisfying. Once completed, the knot is quite bulky, making it an effective stopper knot, especially when used with complex block and tackle systems. The only slightly challenging part of tying the Franciscan knot is the final step of “tightening,” where you need to snug the loops to give it the correct shape.
In reality, it has several interesting competitors (which we’ll discuss in the coming weeks), some of which are even more effective, such as the Cappuccino, French, or Stevedore’s knots. While these types of knots now have limited use, they were once widespread on traditional ships, particularly in variations tied with ropes, cables, and hemp rigging with multiple strands.
But let’s see how to tie it step by step.
The first step is straightforward: with the working end, cross over and then pass over and under the standing part. Leave yourself a fairly long working end, as knots that wrap around themselves tend to “consume” a lot of rope. After that, you “go back up,” wrapping multiple times around the two strands, passing externally to everything.
 How many times? That depends a bit on personal preference and necessity. The longer the knot, the easier it will be to grip.

Finally, to close the Franciscan knot, you need to pass the tail of the standing part through the final loop and tighten it. The shorter this tail is, the more elegant the knot will look. Be careful not to overdo it, or the knot will unravel in your hands.

The post The “Franciscan Knot”: a basic, (fairly) useful, and easy Knot appeared first on Yachting News.
]]>The post Digital Pilot Book: the complete guide to ports and anchorages appeared first on Yachting News.
]]>The new Digital Pilot Book by The International Yachting Media is now online. With over 1,000 anchorages, ports, harbors, and marinas available to browse, this initiative—now in its eleventh year—has been completely revamped, both in terms of design and functionality.
These functionalities are highly appreciated by our readers, who are typically boat owners, skippers, and captains who rely on the guide to find a mooring spot for their boat or, during the busiest months, to locate a safe anchorage near their chosen destination.
Accessing it via smartphone makes it even easier to click on a phone number and call directly to book the desired port, all without any subscription fees—a hallmark of all our publications.
The new edition of the Digital Pilot Book is also available in four languages: Italian, English, French, and Spanish. This feature allows sailors worldwide not only to use this amazing tool but also to add new anchorages, port facilities, or propose updates to existing ones anywhere in the world, directly in their native language.
The digital pilot book integrates these languages into a single platform, meaning that if an English-speaking user adds or updates a port in their language, the same information will be visible to visitors accessing the Italian, French, or Spanish versions.
Many new features are available, which we will explain in more detail below. However, if you’d like to explore them right away, you can navigate directly to the guide by clicking here.

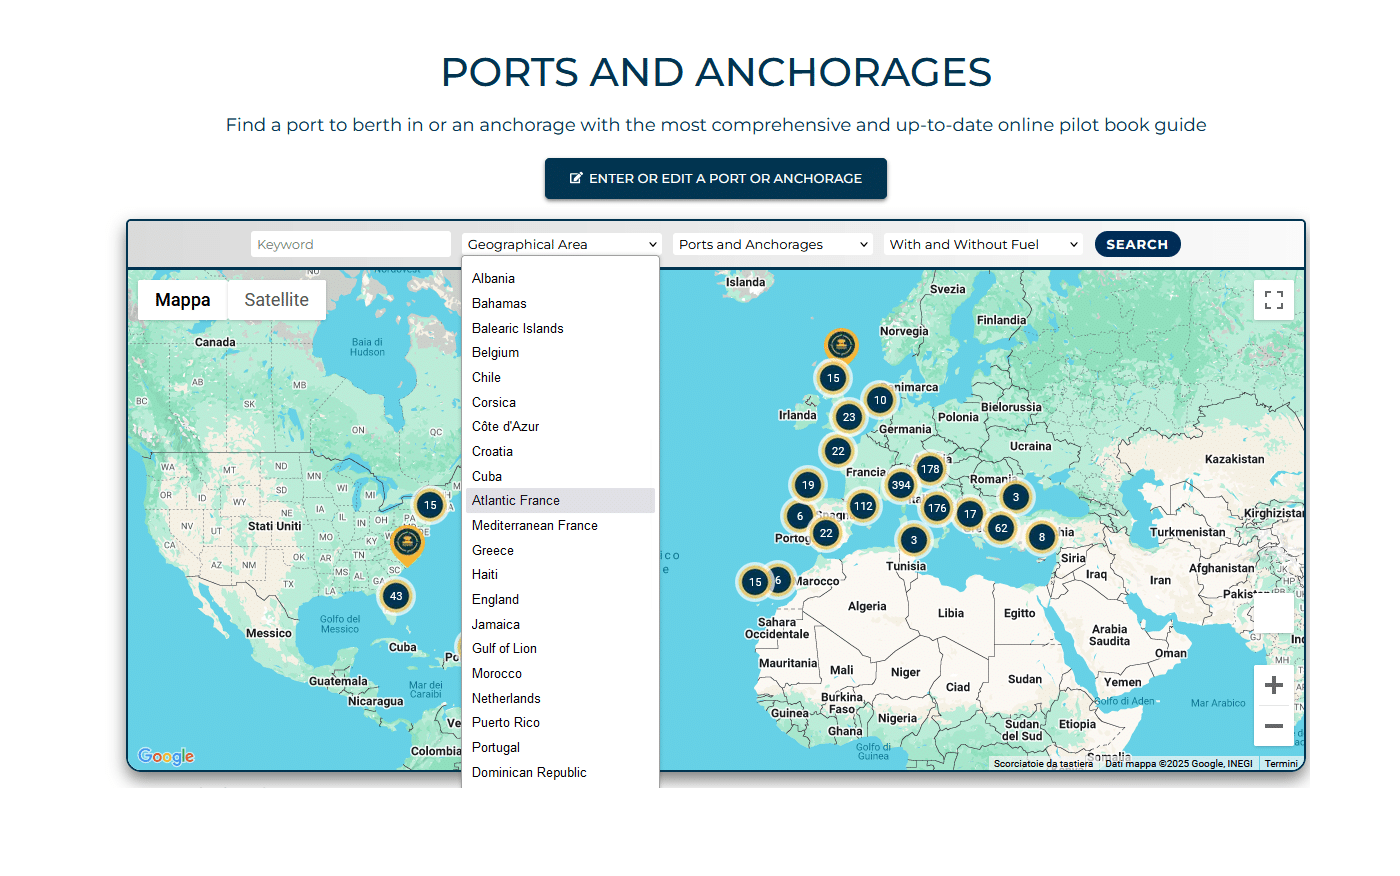
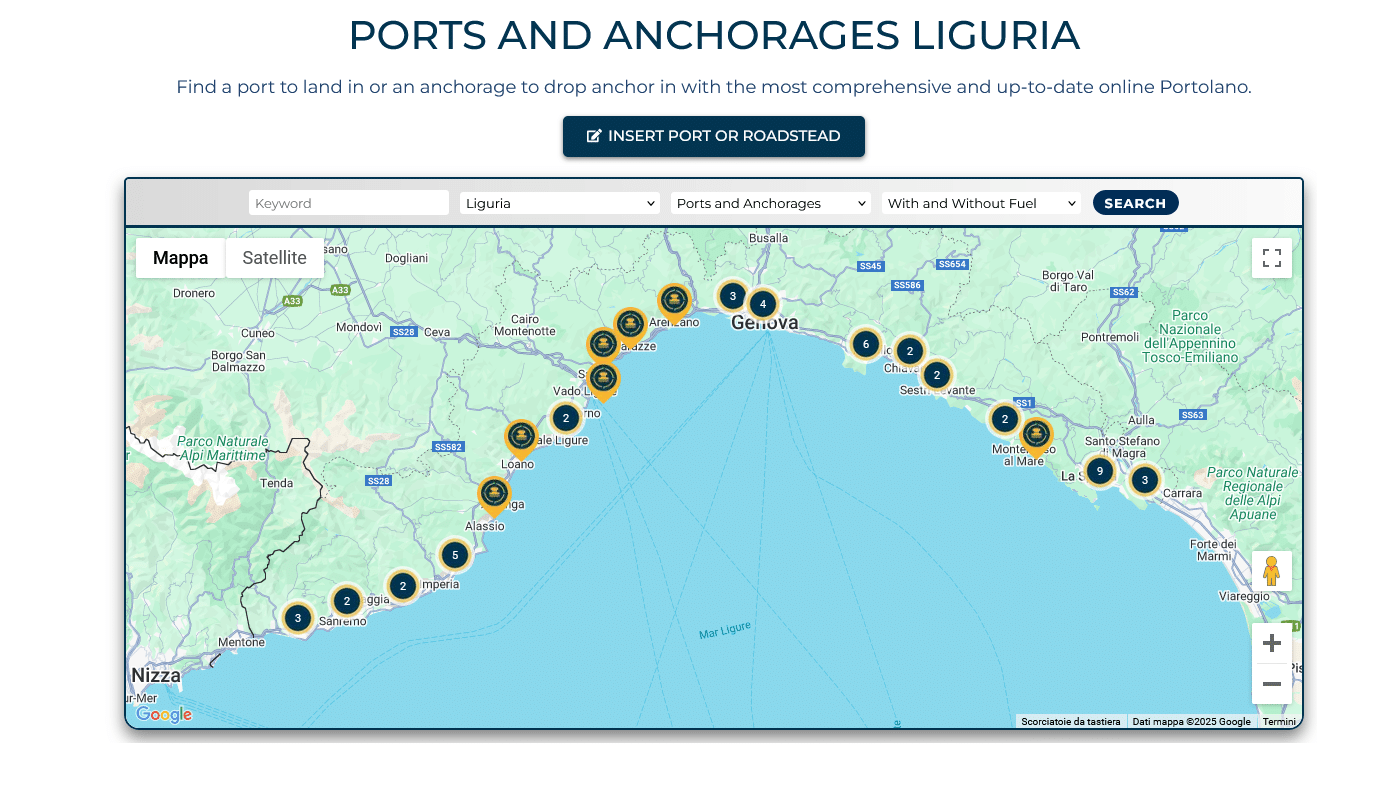
Digital Pilot Book: how to use it
The pilot book is incredibly easy to use. Navigation is done through a drop-down menu, allowing users to select the area they are interested in and check whether refueling services are available in that specific location. If you already know the name of the port or anchorage you are looking for, a quick search using the dedicated search box will suffice.
For example, if you select Liguria as your area of interest, you can refine your search by choosing “Ports and Anchorages” and filter further to find marinas or ports offering fuel services. If you decide that the port of Savona is the most suitable for your needs, clicking on the map will display a detailed port profile.


The post Digital Pilot Book: the complete guide to ports and anchorages appeared first on Yachting News.
]]>The post Weaver’s Knot: little known, very useful appeared first on Yachting News.
]]>It has an intriguing name and is not widely known, but it is useful and easy to tie. It belongs to the large family of “loops, eyelets, or nooses on a single rope,” at least according to the definition in the “bible” of Clifford W. Ashley, The Complete Book of Knots.
So, if you need, for example, to set up a block and tackle to reduce the load in tension, if you need to secure a package, or simply create a hitch point on your rope, here’s the weaver’s knot: it’s tied in no time, and unlike knots generally used by less experienced sailors, it can be undone even after enduring very strong tensions.

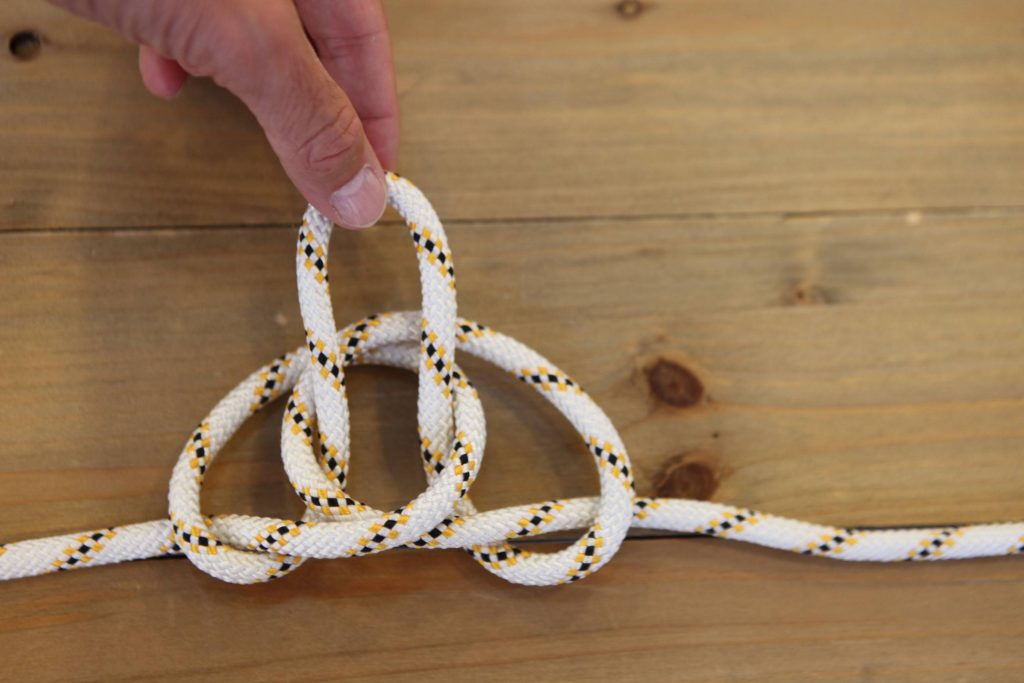
The temptation is to make a simple loop with a simple knot or a figure-eight knot (as shown in the photo above), but keep a good knife handy if you want to untie them after heavy and prolonged tension. Let’s see how to tie the weaver’s knot. First, create a nice long loop at the desired point along the rope.
 The second step involves rotating the loop onto itself.

At this point, you need to “fold” the figure-eight that has formed (downward in the photo).
 Now comes the key moment for executing the weaver’s knot: first, locate the central passage created at the center of the figure-eight.
 Then, pass the end of the loop through it, from underneath.
 Now pull (upward in the photo), always keeping a bit of tension on both ends of the rope.
 Finally, after tightening well, the weaver’s knot is complete.

The post Weaver’s Knot: little known, very useful appeared first on Yachting News.
]]>